USA Independence Day SALEExclusive Pricing on CADlink DTF Software, ET-8550 DTF Bundle, ProColored DTF Printers, xTool Apparel Printer, and eufyMake UV Printer.
The Ghost Underbase: What to Do When Cadlink Digital Factory is Not Printing White DTF Ink
Introduction: The Frustration of the Missing Underbase
You’ve spent hours perfecting a complex, high-color design. You hit Print, the printer hums to life, and the vibrant colors lay down perfectly on the film. You anxiously wait for the crucial step—the application of the bright, opaque white underbase—but it never comes.
Instead, you’re left with a beautiful but utterly useless translucent print, destined to crack and fade the moment it hits the heat press. Your white ink channel is printing a ghost.
The feeling is utterly frustrating. It’s an issue unique to DTF printing, where the white ink is the foundation of your final product. What’s worse is the lack of a clear fix. Is it a clogged printhead? A damper issue? Or is the complex Cadlink Digital Factory RIP software secretly sabotaging your job?
You feel alone in the print shop, wasting expensive film and ink with every failed run.
The good news is you are not alone, and the solution is closer than you think. The team at DTF Gears has compiled the ultimate, two-phase troubleshooting guide to isolate, diagnose, and permanently fix the dreaded white ink failure in your DTF workflow. We break the problem down into the only two places the issue can exist: Physical Printer/Ink Issues and Cadlink Digital Factory Configuration Issues. Continue reading to learn exactly which knobs to turn and which buttons to press to get that perfect, dense white underbase back.
Before you even touch your Cadlink settings, you must confirm that your DTF printer’s hardware is capable of firing white ink. This crucial first check eliminates half of the headache when troubleshooting DTF white ink failure.
The Essential “No-Software” Nozzle Check
The fastest way to determine if your problem is hardware (clogged head, air bubble, ink settling) or software (Cadlink settings) is by forcing the printer to perform a nozzle check directly from the machine itself. This bypasses the computer, the driver, and the RIP software entirely.
Key Diagnostic Procedure:
Load DTF Film: Crucially, always perform this test on a piece of DTF transfer film, not plain paper. The white ink is designed to cure on the film and will be nearly invisible on standard white paper.
Access Maintenance Menu (Printers with Screens): Navigate the printer’s on-screen menu to find the Maintenance or Cleaning section. Look for an option explicitly labeled “Print Head Nozzle Check” or “Nozzle Check.”
Use Physical Buttons (Screen-less Printers): For many entry-level printers without a display screen, this function is often mapped to a button combination. Try pressing and holding the Ink Button for several seconds. If that fails, try holding the Power or Maintenance button.
Check Results:
If White Prints Perfectly: Great news! Your printhead and ink flow are fine. The problem is 100% in your Cadlink software settings.Proceed directly to Phase 2.
If White is Streaky, Missing, or Faint: Your problem is hardware or maintenance related. Continue with the next troubleshooting steps in this Phase.
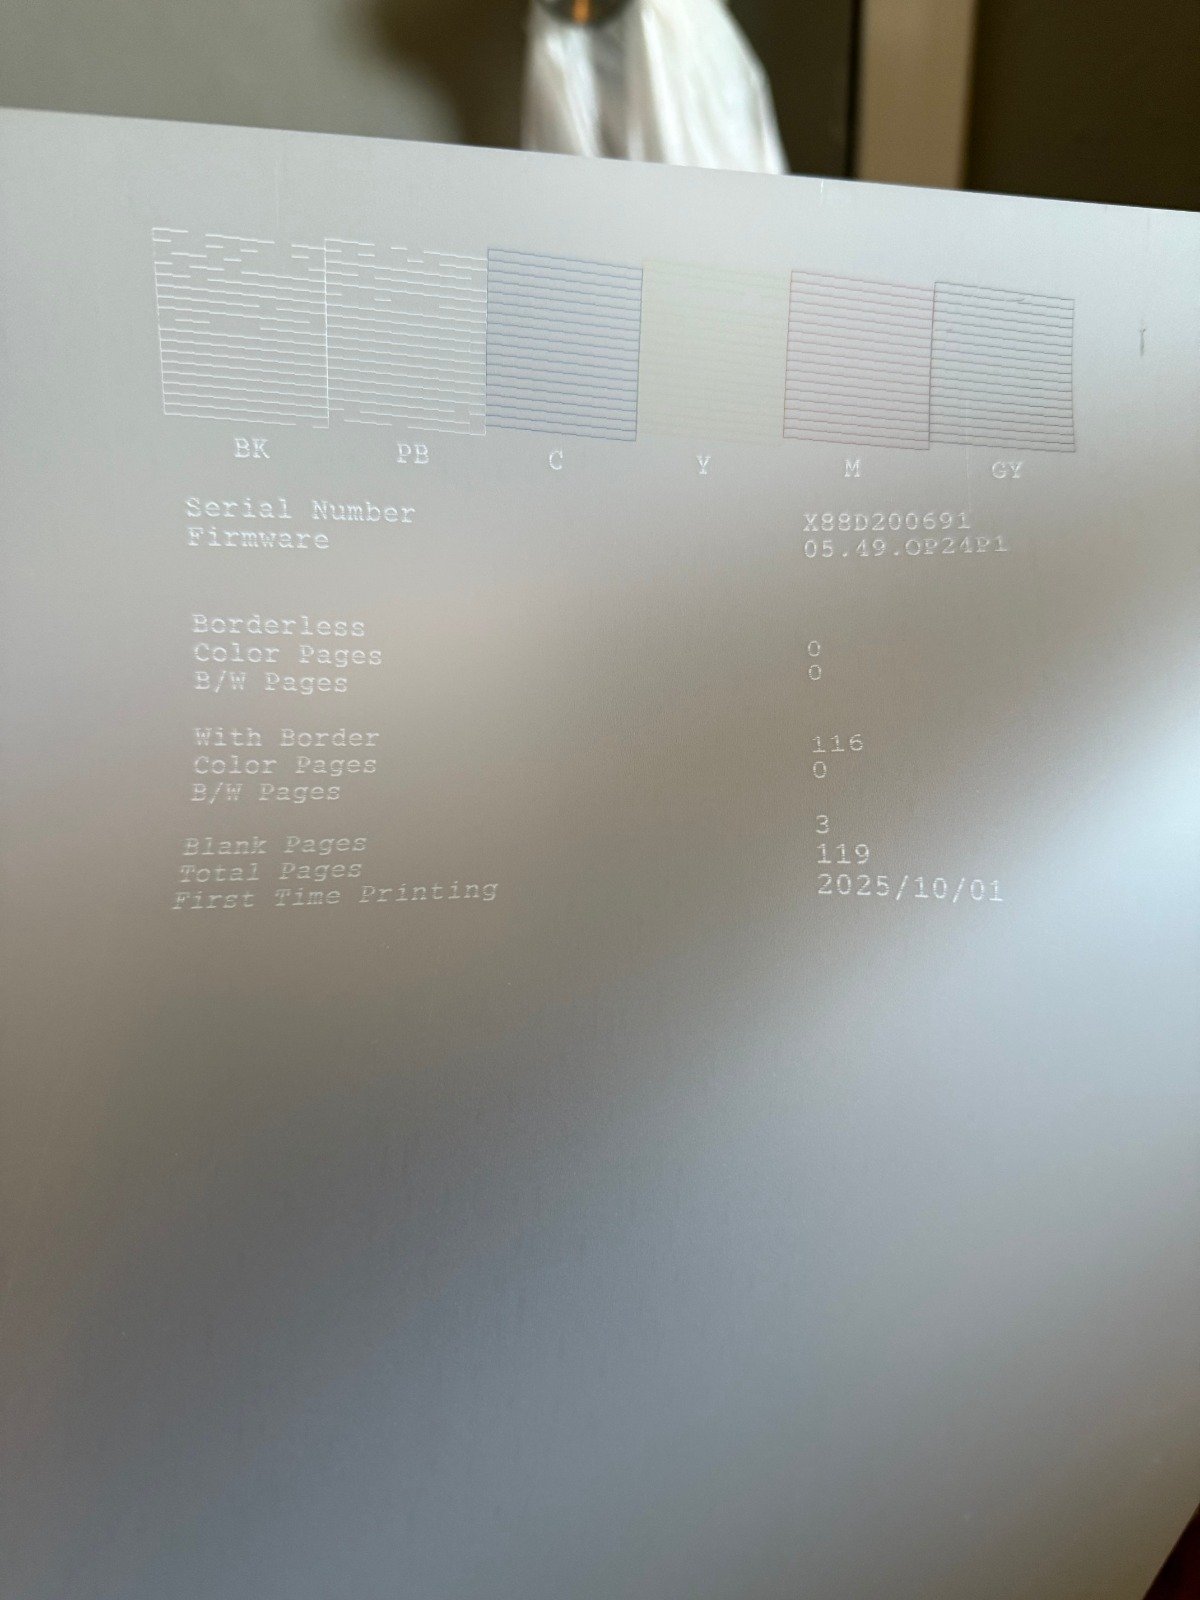
Here is an image of how Nozzle check for a very common printer (Epson ET-8550) looks like on a DTF paper:
The White Ink Maintenance Escalation Plan
If your nozzle check fails, the white ink channel is either clogged or starving. White ink, being heavier and thicker due to its titanium dioxide pigment, settles quickly and requires consistent agitation and cleaning. Follow these steps in order of increasing intensity:
Run Printer-Level Cleaning Cycles:
From your printer’s control panel or the dedicated printer utility software, run the standard Head Cleaning cycle.
If the standard cycle fails, run the more aggressive Power Cleaning cycle (if available on your model). Caution: This uses a significant amount of ink.
After each cleaning, perform a new Nozzle Check to verify improvement.
Ensure Proper Ink Agitation:
If your DTF printer has an internal recirculation or agitation system, verify that it is on and functioning.
If you use external bulk bottles, shake the white ink bottles thoroughly before printing and periodically throughout the day to prevent the pigment from settling at the bottom, which is a common cause of poor flow.
The Last Resort: Manual Printhead Cleaning:
If all automated cleaning fails, the printhead requires manual intervention. This is an advanced step and should only be performed with the correct DTF cleaning solution and a detailed guide.
Actionable Step: Search YouTube for “Manual Printhead Cleaning [Your Printer Model]” or “[Your Printer Model] DTF Head Soak” to find visual, step-by-step instructions specific to your hardware before attempting any manual cleaning.
Phase 2: Cadlink Digital Factory RIP Software Configuration Fixes
If you passed the nozzle check, the hardware is fine. The only remaining culprit is the Cadlink Digital Factory RIP. The software is either failing to generate the white layer or is not sending enough density data to the printer.
The Critical White Underbase Density Adjustment
The most common software oversight is an incorrect Underbase density setting. This dictates the amount of white ink laid beneath your colors.
You need to manually verify and adjust this core setting for your print queue:
Navigate to Queue Settings: IGo to Queue > Properties (at the bottom) > Color Layer > Processing Options.
Verify Underbase is Selected: Under White Underbase/Highlight Options, ensure the “Underbase” radio button is selected, not “None” or “Highlight.”
Locate and Set the Slider: Find the Maximum Ink % (White ink strength) slider. This is your density control. If the setting is currently low (e.g., 20%), it explains the issue. Push the setting up to a conservative 70% as a starting point.
Test and Fine-Tune: Print a small test swatch. If the white layer is still weak or translucent, increase the density setting in small increments (e.g., to 80% or 90%) and repeat the test until you achieve the desired opaque white layer.
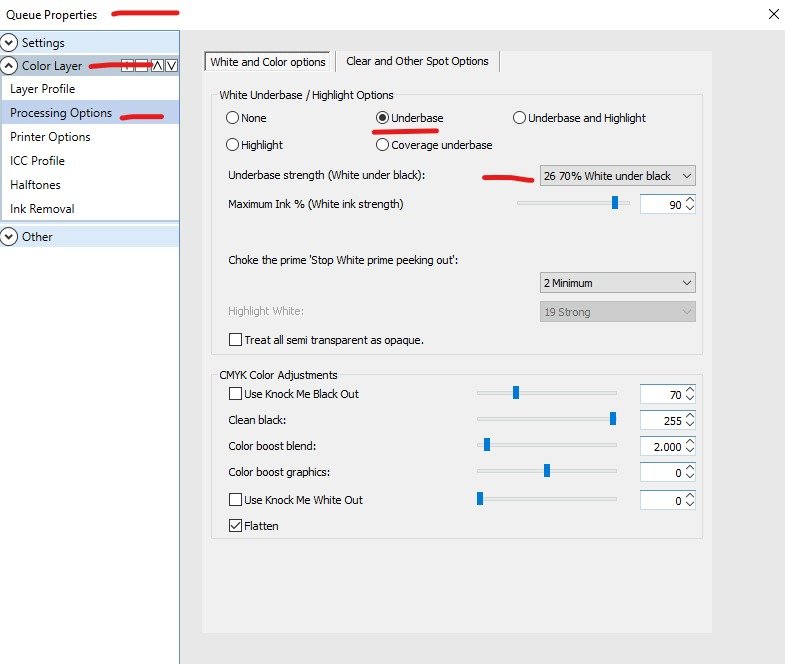
Visual Guide: Cadlink Digital Factory Processing Options
This screenshot highlights the key areas in Cadlink where you must ensure the Underbase option is selected and the Maximum Ink % (White ink strength) slider is set high enough (e.g., 70-90%) for proper opacity.
Conclusion: Get Back to Perfect DTF Printing
The frustration of a missing white underbase can halt production, but by systematically breaking the problem into two phases—Physical Maintenance and Cadlink Settings—you can quickly identify and fix the issue. Whether it’s the constant battle with white ink settling in Phase 1 or the simple misconfiguration of the underbase density in Phase 2, a methodical approach is the key to consistent, high-quality DTF transfers.
We hope this detailed troubleshooting guide was helpful in resolving your white ink printing issues. For more visual guides, step-by-step tutorials on Cadlink settings, and essential DTF maintenance tips, be sure to connect with us!
For more help and in-depth video tutorials, subscribe to the DTF Gears YouTube Channel:
We use cookies to improve your experience on our site. By using our site, you consent to cookies.
This website uses cookies
Websites store cookies to enhance functionality and personalise your experience. You can manage your preferences, but blocking some cookies may impact site performance and services.
Essential cookies enable basic functions and are necessary for the proper function of the website.
Name
Description
Duration
Cookie Preferences
This cookie is used to store the user's cookie consent preferences.
30 days
These cookies are needed for adding comments on this website.
Name
Description
Duration
comment_author
Used to track the user across multiple sessions.
Session
comment_author_email
Used to track the user across multiple sessions.
Session
comment_author_url
Used to track the user across multiple sessions.
Session
Google Tag Manager simplifies the management of marketing tags on your website without code changes.
Name
Description
Duration
cookiePreferences
Registers cookie preferences of a user
2 years
td
Registers statistical data on users' behaviour on the website. Used for internal analytics by the website operator.
session
Statistics cookies collect information anonymously. This information helps us understand how visitors use our website.
Google Analytics is a powerful tool that tracks and analyzes website traffic for informed marketing decisions.
Contains information related to marketing campaigns of the user. These are shared with Google AdWords / Google Ads when the Google Ads and Google Analytics accounts are linked together.
90 days
__utma
ID used to identify users and sessions
2 years after last activity
__utmt
Used to monitor number of Google Analytics server requests
10 minutes
__utmb
Used to distinguish new sessions and visits. This cookie is set when the GA.js javascript library is loaded and there is no existing __utmb cookie. The cookie is updated every time data is sent to the Google Analytics server.
30 minutes after last activity
__utmc
Used only with old Urchin versions of Google Analytics and not with GA.js. Was used to distinguish between new sessions and visits at the end of a session.
End of session (browser)
__utmz
Contains information about the traffic source or campaign that directed user to the website. The cookie is set when the GA.js javascript is loaded and updated when data is sent to the Google Anaytics server
6 months after last activity
__utmv
Contains custom information set by the web developer via the _setCustomVar method in Google Analytics. This cookie is updated every time new data is sent to the Google Analytics server.
2 years after last activity
__utmx
Used to determine whether a user is included in an A / B or Multivariate test.
18 months
_ga
ID used to identify users
2 years
_gali
Used by Google Analytics to determine which links on a page are being clicked
30 seconds
_ga_
ID used to identify users
2 years
_gid
ID used to identify users for 24 hours after last activity
24 hours
_gat
Used to monitor number of Google Analytics server requests when using Google Tag Manager
1 minute
SourceBuster is used by WooCommerce for order attribution based on user source.
Name
Description
Duration
sbjs_first
Traffic origin information for the visitor’s first visit to your store (only applicable if the visitor returns before the session expires)
session
sbjs_current
Traffic origin information for the visitor’s current visit to your store
session
sbjs_first_add
Timestamp, referring URL, and entry page for your visitor’s first visit to your store (only applicable if the visitor returns before the session expires)
session
sbjs_current_add
Timestamp, referring URL, and entry page for your visitor’s current visit to your store
session
sbjs_migrations
Technical data to help with migrations between different versions of the tracking feature
session
sbjs_session
The number of page views in this session and the current page path
30 minutes
sbjs_udata
Information about the visitor’s user agent, such as IP, the browser, and the device type